Like the rest of your home, your foundation exterior requires maintenance to keep it in tip-top shape. Painting your exterior foundation tracks, in terms of timing, with the rest of your house. Pros recommend painting every five to 10 years, depending on your weather and the quality of your previous paint job.
Exterior foundations come in a range of materials based on your home’s age, style and where you live. But brick, cement block and concrete top the list, so we’ll focus on those in this post.
Painting your exterior foundation is pretty easy as DIY projects go. Let’s break it down.
Step 1: Inspect It
Before you haul out the sprayer and paint, walk around your house. Inspect the foundation for cracks, broken brick or cracked cement, leaves piled against it, and anything else that might need attending to before you paint. If you notice cracks or broken brick, repair these before you paint. Remove any impediments like leaves, brush or dirt that have piled up against the house.
Step 2: Clean It Up
Once you’ve done your inspection, made repairs and removed impediments, it’s time to clean. Use a hose or a power washer set on low to rinse it off (don’t use high power because you can damage the foundation). Once that’s done, use a wire brush to scrub off any remaining dirt, plant matter or other debris. Then let it dry.
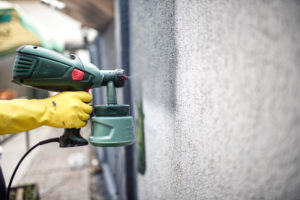
Step 3: Prime It
Break out your paint sprayer because a paint brush or roller just won’t do the trick. When painting your exterior foundation, the sprayer applies a quick, flat coating. Paintbrushes and rollers take forever, and the paint absorbs rather than staying on the surface.
Use a primer made for your type of foundation. Protect the ground and foundation plantings by draping tarps or plastic against the house. Cover and tape any basement windows or doors.
If you’ve never used a sprayer before, practice on a piece of cardboard or old drywall until you get the hang of the technique.
Now, spray on the primer, covering evenly as you go. A few tips:
- Start a stroke before you pull the trigger and continue the stroke after you release it. This will keep too much paint from building up on the surface.
- Paint at an even speed to get even coverage
- Spray straight toward the foundation, not at a sharp angle
- Wipe the tip of your sprayer regularly to keep paint from clogging
- Do the corners first then work from the top down
Step 4: Paint It
Once your primer is dry, it’s time to paint. Follow the same technique you used with the primer, painting evenly and smoothly, starting with the corners, and then working from the top to the bottom of the foundation.
Let the first coat dry and then do another. In most cases, two coats provide good coverage. But if you’re covering a darker color with a lighter one, or if you can still see foundation through the paint, do one or two more, until you get the coverage you want.
Painting your exterior foundation is a project you can do in a weekend. But if you’d rather kick back with a beverage and let someone else do the work, we’re here to help. Learn more about our exterior house painting services. And, if you’re picking paint colors for indoors or out, our color consultants can help you find exactly the right color scheme for your home.